I’m a British passport holder, but my girlfriend is Thai so needed to apply for a UK visitor visa to travel with me for a holiday to the UK. We spoke to numerous people who had already applied for one and heard many stories of people that had been refused a visa for various reasons. As we didn’t want to be refused a visa , we did many hours of research to find out what was needed to ensure we got the visa at the first attempt.
Hover over the above image and then pin to your Pinterest board. This will help spread the word so others can also get a UK visa.
The process itself is fairly straightforward, but the UK visa website is quite vague on many points, so it’s not totally clear exactly what documents you need to submit. We only found out the extra information by spending hours trawling through numerous websites and forums to find out what was needed.
We also contacted a few companies that provide a visa application service, but were shocked to find that many charged $700 or more. You can go that route if you want, but why waste $700 when you can do this yourself? We have laid out the whole process for you in this post and also included lots of additional information and tips to help you.
The good news is that we got the visa on our first attempt. And here it is…
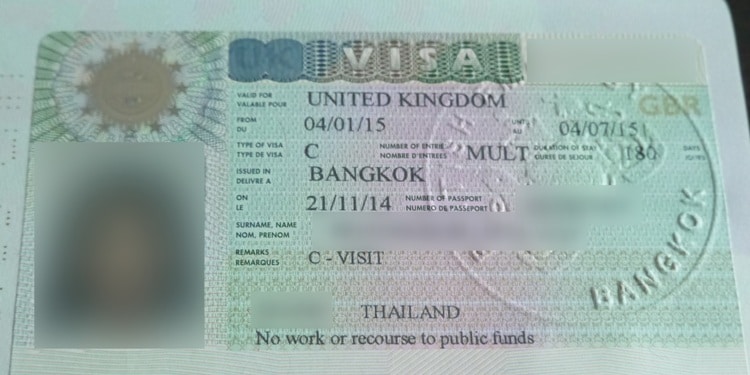
We applied for the visa in Bangkok, but the process will be similar wherever you are based. VFS Global is the official partner of UK Visas & Immigration, so you’ll need to apply via them. Their website is https://www.vfsglobal.co.uk/global/index.html. Go there and click on your home country to get the process started.
We feel like we know the process fairly well now, so decided to write this extended post to help others who may also want to apply for a UK visitor visa.
First of all you’ll need to check if you need a visa. You can do this at https://www.gov.uk/check-uk-visa. This post only covers applying for a short-term Visitor Visa (up to 6 months). This is the type of visa you need if you’re planning to visit the UK as a tourist. Applying for a long-term Visitor Visa is a similar process, so you can still use this post, but just bear in mind that we didn’t apply for a long-term visa, so can’t comment on any extra paperwork that may be needed.
You can apply for the visa up to 3 months before the date you plan to arrive in the UK. The vast majority of decisions are made within 3 weeks. You can check current processing times for your location here: https://www.gov.uk/visa-processing-times. I just checked for our location in Bangkok and it shows that 13% of decisions were made in 3 working days, 16% in 5 days, 88% in 10 days, 99% in 15 days and 100% in 30 days. This data relates to November 2014. It might be different at your location, so be sure to check using the above link.
We handed the visa application in on 10 November and picked up the passport with visa on 25 November, so it took a total of 12 working days.
What You Need To Show
The following information is my personal understanding of the rules, so you should be sure to follow the official guidance issued by the UK Border Authority, as that is the most exact and up to date information. My aim here is to help you understand what they want and provide you with the information you need for a successful application.
To succeed in getting a UK Visitor Visa I believe that you need to show three things:
1. The first thing you need to show is that you are a genuine visitor and that you have a genuine reason to visit the UK.
This will be different for different applicants, but will usually simply be a case of you wanting a holiday in the UK. So your reason may be as simple as wanting to visit London for a week. In our case, we were planning to travel together as a couple, so the reason we gave was wanting to visit the UK as part of our 5-month European travels.
2. The second thing you need to show is that you will have enough money for your stay and that you will also have accommodation for the duration of your stay.
This is where it can get a little tricky because there is no set amount of money that you need to show. Everyone’s circumstances are different. If you’re planning to spend two weeks at a 5-star hotel in London, then you’ll need to show more money per day than someone staying 2-3 months with friends and family.
The money for your daily expenses and accommodation can be yours, from a sponsor (e.g. husband, wife, girlfriend, boyfriend, family) or from a third party. It can also be a combination of these. If you are providing all the money yourself, you just need to show your bank statements from the last 6 months. In Thailand we also needed to get an official letter from the bank confirming the balances on the account. I’d advise getting a similar letter if available in your country. When applying for a visa it’s best to provide more documents than are needed than to get refused a visa because you didn’t provide some specific document that might have provided the proof they were looking for.
If a sponsor or third party is providing all or part of the funds needed, then you’ll also need to show their bank statements and bank letter. They will also need to write a cover letter explaining why they are funding your trip. An example would be that you’re going on holiday with your boyfriend and that he’s paying for the trip.
You don’t need to book any hotels in advance before applying for the visa, but you should print out details of the hotel(s) that you’re planning to stay at. I used Agoda.com to find a suitable hotel, selected the dates and then printed out the page. This shows that you have done your research and have a hotel in mind to stay at. It also shows that you are aware of the costs involved and have taken this into consideration.
If staying with friend or relatives they’ll need to write you an invitation letter saying that you can stay at their property and that a room is available for your exclusive use. They will also need to show that they either own or rent the property. If they rent the property they’ll also need to get a letter from their landlord confirming that it’s ok for you to stay at the property.
3. The third thing you need to show is that you will leave the country before your visa expires.
This is something that will differ depending on circumstances. If you’re currently working and have a week or two holiday leave you’ll need to get a letter from your employer explaining that you work there, have been given time off and are expected back at work on a particular date. So your reason to return would be your job.
In our case, the reason to return was that we lived together in Bangkok and I have long-term permission to stay in Thailand. So there is no reason to overstay the visa. We also showed additional documents, like Miu’s house and car ownership, as further proof of her reason to return home. And just for good measure we also listed every country that she had visited and returned from without overstaying any visa. We think all these together showed that there was no chance of her overstaying her visa.
Having family, and even children, is often not seen as a reason to return to your home country.
Suppose you are single, don’t have a job but have a little money, then you may be seen as having no reason to return to your home country. So it’s important that you show a genuine reason to return.
Common Reasons for Refusal
While doing our research we came across numerous reasons that people were refused a visa. It’s good to be aware of these because you can ensure you show enough proof so that you don’t get refused for the same reasons.
- Missing documents. UKBA expects you to provide originals of all relevant documents. If any are missing they won’t call or email you to check but will just refuse your application. Everyone’s application is different, so make sure you supply ALL relevant documents. Don’t listen to anyone that says you don’t need a particular document. They may not have needed that document, but you may need it because your case is different.
- Supplying the incorrect form or not filling the form in properly. It is essential that you use the correct application form for your situation and that you answer all questions honestly and consistently. Re-read the form a few times to make sure everything is correct. Also make sure all answers are consistent with each other.
- Misleading information. It should go without saying that all information provided should be honest. Any deception or lying will see your application rejected. You may also be banned from applying again for up to 10 years. Take this very seriously.
- Presentation. You should write a cover letter explaining your application and include all documents in a logical order. You need to make the job of the visa officer as easy as possible. Handing in documents in some random order may well mean they miss something and refuse your application. It is your job to present your case properly.
- Insufficient funds. It should be obvious to you that you need enough money for your visit. While no set amount is documented, use some common sense. If you’re planning to spend time in an expensive city like London it should be obvious that you need much more money that if staying with friends in a smaller UK town.
- Insufficient proof of sponsor relationship. If your sponsor is paying for your expenses you need to show that a genuine relationship exists. So if you are a woman applying for a visa and your boyfriend is sponsoring you, you need to show sufficient proof of your relationship. If you live together you can provide documents such as bank statements going to the same address. You also need to provide photographs of the two of you together. If you don’t live together, then other proof such as email exchanges and phone call evidence should be provided.
Completing the Application Form
First of all you need to head to http://www.vfsglobal.co.uk/ to start your application. You’ll see this page to begin with:
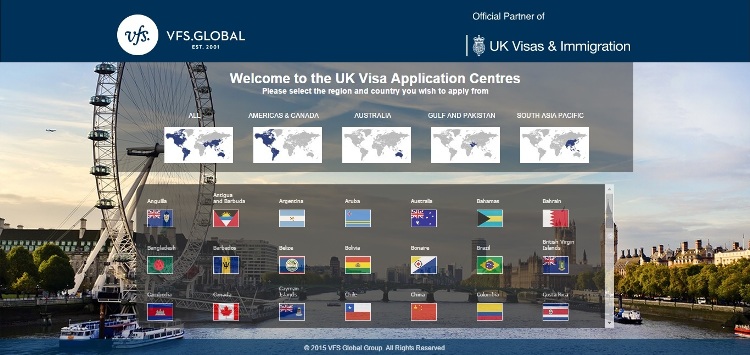
Next step is to choose your country. For this example I’ve chosen Thailand, as that is where we applied from. But the steps will be similar whatever country you’re applying from. Once you’ve selected your country you’ll be shown the following page, which has a very simple 3-step process.
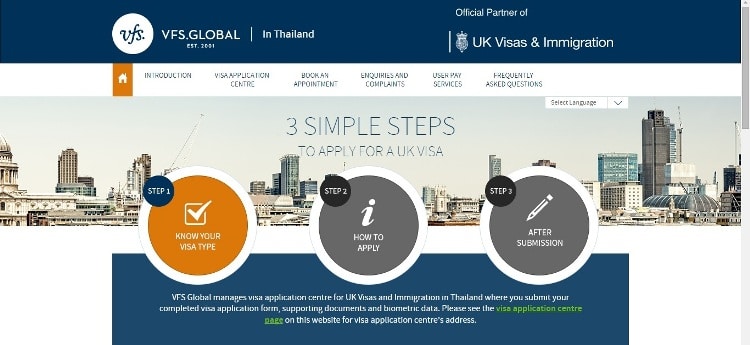
Step 1 – Know Your Visa Type
This step simply prompts you to go to https://www.gov.uk/check-uk-visa to check what type of visa you need, if any. This post is all about getting a general visit visa, so hopefully this is what this step will tell you that you need.
Step 2 – How To Apply
Step 2 is a 5-step process, as follows:
Step 1 – Complete the application form
Step 2 – Book an appointment
Step 3 – Take you application form and supporting documents to the visa center
Step 4 – Have your biometric information taken (photograph and fingerprints)
Step 5 – Choose whether to collect your passport and documents in person or have them posted to you
For step 1, you need to head over to https://www.gov.uk/apply-uk-visa to start the application process. From this page you’ll notice that you must apply in person if you’re from North Korea or use the beta service if you’re in China. For everyone else, just click the Start Now button.
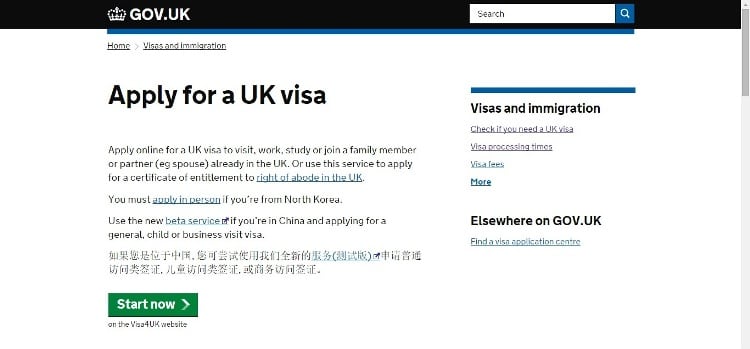
Once you’ve clicked the Start Now button you’ll be taken to the Visa4UK website (https://www.visa4uk.fco.gov.uk/) to register for an account.
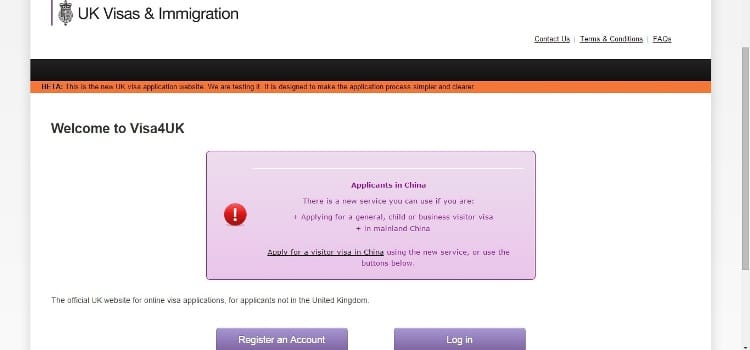
Click the Register an Account button and fill in the details, being especially carefully to double check that all details are correct. Once you’ve done this you’ll be emailed details of how to continue. Click the link in that email to unlock your account and you’ll be taken to the Log in page. Log in using your email and password and you’ll be prompted to start the application process.
The next page will contain important information that you need to read carefully. It also contains links to help pages. I suggest you read these before completing your application form.
At this point I’d also suggest getting all your documents and other information ready, as the application form is 11 pages long and asks lots of questions that you need to have the answers for.
Once you start the application process you’ll be asked what visa type you’re applying for. This post relates to the following:
Reason for visit: Visit
Visa Type: General Visitor
Visa SubType: (General) Single, double and multiple, valid up to 6 months
Other sub visa types are Long-Term Visitor Visa for 1, 2, 5 or 10 years. The process for these longer-term visas will be similar, although you’ll need to provide more proof of why you think you need longer-term visas. For example, if you have relatives in the UK that you want to visit regularly, then that is a reason to want a 10-year visa.
Once you’ve chosen the above you’ll be onto the main part of the application process. This has sections on:
- Passport and Travel Information
- Personal Details and Travel History
- Family Details
- Employment and Income
- Family and Friends in the UK
- Medical Treatment
- Additional Information
You need to complete each section in order and can’t move onto the next one until you’ve fully completed answering the questions on the current section.
Once you’ve completed the application I suggested going over each section a couple of times to make sure everything is correct. Any misspelling of names or incorrect passport details will likely invalidate your application. It is your responsibility to make sure everything is correct.
At this point you’ll be prompted to pay and book an appointment. Note that your application is not complete until you’ve paid and booked the appointment. Nothing will happen with your application until you’ve completed that part.
After you’ve booked your appointment, the next step is to gather together all your supporting documents to take with you to your appointment. It is important that you have all these documents to take with you. If, for example, you need a friend or relative in the UK to write you a covering letter, then you need to make sure this arrives before your appointment. So don’t book an appointment for a couple of days away if you know that there are documents you won’t have ready. I can’t stress this point enough – you need to have ALL documents available for your appointment. You can reschedule your appointment, but if you turn up with missing documents you’ll most likely have to pay for a new appointment.
The next step is to print off and take your application form and all supporting documents to your appointment. These will be checked and you’ll also have your photograph and fingerprints taken.
You’ll also be asked if you want to collect your passport and documents in person or have them sent to you.
That’s the end of the 5-step, Step 2 process.
Step 3 – After Submission
After submission it’s just a case of waiting for an email or SMS to let your know that your passport is ready to be picked up (or posted if you chose that option). It was exactly two weeks from our application to the passport arriving back at the visa center.
The passport and documents are in a sealed envelope, so staff at the VFS Global visa center don’t know if the visa was granted or not. When you go to pick up your passport you’ll need to open the envelope in front of them and check your passport for the visa. Note that the visa may be placed anywhere in the passport, so don’t expect it to be near the front. Ours was on about page 10 in a brand new passport. It would be easier if they put the visa on the first blank page, but for some reason they prefer to put it on some random page.
If you’ve followed the advice in this book you should at this point have your UK visa. Go celebrate and look forward to your trip to the UK.
List of Documents Needed
The documents that you’ll need to show will depend on your exact circumstances. For a simple 2-week holiday that you’re paying for yourself you’ll need much less than for a 6-month trip where someone else is sponsoring all or part of your stay. If there are some documents that you’re not sure if you need or not, I suggest taking them anyway. It’s better to be over-prepared than under-prepared. If you supply any that aren’t needed it won’t harm your application. If you’re trying to prove a specific point, then the more proof you offer, the better. Here’s what we provided. I have included notes to show why we supplied the documents we did, as this will help with your application.
I’ve broken this list up in four different sections, so you can clearly see why we provided each set of documents.
Essential Documents
Passport – make sure that there will be at least six months remaining from the date you plan to leave the UK.
Hotel Details – You don’t need to book your hotel in advance, but do provide details of the hotel(s) you plan to stay at, along with the cost. We chose the hotels we wanted to stay at using Agoda.com and printed out the details. It’s important that you do this because it shows that you have actually researched the trip and are aware of the costs involved.
Flight Details – Do not book the flight in advance, but like with the hotels above, choose a flight and print out the details. You need to show that the trip is affordable, so you should have enough money to cover flight and accommodation costs as well as day to day expenses. The flight details will usually be a return flight unless you’re planning to travel to a third country after your visit to the UK.
Cover Letters – We included two cover letters, and I think this is very important, even though they aren’t asked for. A cover letter is a great way of explaining the whole trip and pointing out why you’re a genuine traveler, how you can afford to finance the trip and why you will leave at the end or visit. I’ve included sample cover letters at the end of the book.
Reason For Visit
One of the things you need to prove is that you are a genuine visitor to the UK and that your visit is genuine. This is a bit vague, but we proved this my showing past travel. We had spent six months traveling around Southeast Asia, so we printed out various documents that showed that we were genuine travelers.
Passport Stamps – We showed all passport stamps and visas from previous countries that we had visited.
Flight Tickets – We also showed previous flight tickets that showed that we were frequent travelers.
Proof Of Funds
Next you need to provide proof that you have enough money to fund your travels and also have a place to stay.
Bank Statements – We provided the last 6 months of bank statement for both Miu and myself (her sponsor).
Bank Letters – We also included official bank letters that confirmed the balance he account. This is standard practice in Thailand but may not be available in other countries. I’m not sure we needed these, but as I mentioned earlier, it’s better to be over-prepared.
Cover Letter – A cover letter from me explain that I was sponsoring Miu, providing proof of our relationship and reasons why we would both return to Thailand.
Proof Of Relationship
As I was partly sponsoring Miu for this trip we had to show proof of our relationship. For this we supplied copies of past flights that we took together, photos of us together and with friend and family and matching stamps in our passports, as further proof that we had traveled together in the past.
Flight Tickets – Copies of all past flights tickets where we traveled together.
Passport Stamps – Copies of all passport stamps for countries that we traveled to together.
Photos – Photos of us with friends and family over the years. We printed three photos we A4 sheet with a brief explanation of where and when the photos were taken.
Reason To Return
You’ll also need to prove that you leave the UK at the end of your trip and not overstay your visa. We did this by showing proof of travel to all other countries visited without overstaying, proof of home and car ownership in Thailand and proof of my permission to stay long-term in Thailand, which meant we’d both have a reason to return.
Passport Stamps – Copies of all passport stamps for countries that we traveled to together, showing that we never overstayed.
Thailand Visa – Copy of my visa and long-term permission to stay in Thailand. This, together with proof of our relationship showed that Miu would not want to overstay.
Onward Travel – We also showed an itinerary of our travels around Europe after visiting the UK. This was further proof that we had other travel plans and wouldn’t want to overstay.
These were our document, which amounted to about 70 pages in total. If you’re on a simple 2-week holiday it would be ideal to get a letter from your employer mentioning how long you have worked at the company and saying how you have been given time off for your holiday and that you are expected back at work at a certain date.
Conclusion
As you’ll probably appreciate, every case is different, and the above is what worked for us. Hopefully this will help you understand the process a little better and help you prepare your application. Comments and questions are welcome.
Hotels In The UK
As you’re planning to visit the UK, we’d suggesting using Agoda UK for your hotel bookings, as they have a great range of hotels.


